How to Install a Bumblebee CPE Image
- Sherry Wei
- Jun 30
- 2 min read

Updated: Jul 9
If your organization prefers to install the Bumblebee CPE image and ship the CPE yourself, here are the steps to follow.
Installation Steps
This process applies to the scenario where the CPE is in the factory reset state (i.e., it has not yet been assigned a CPE ID, a unique string assigned by Bumblebee Networks). The next section describes the process for setting up a CPE after it has been assigned a CPE ID.
Step 1. Create Device
Follow the BN-CPE-1000 tutorial to create a CPE.
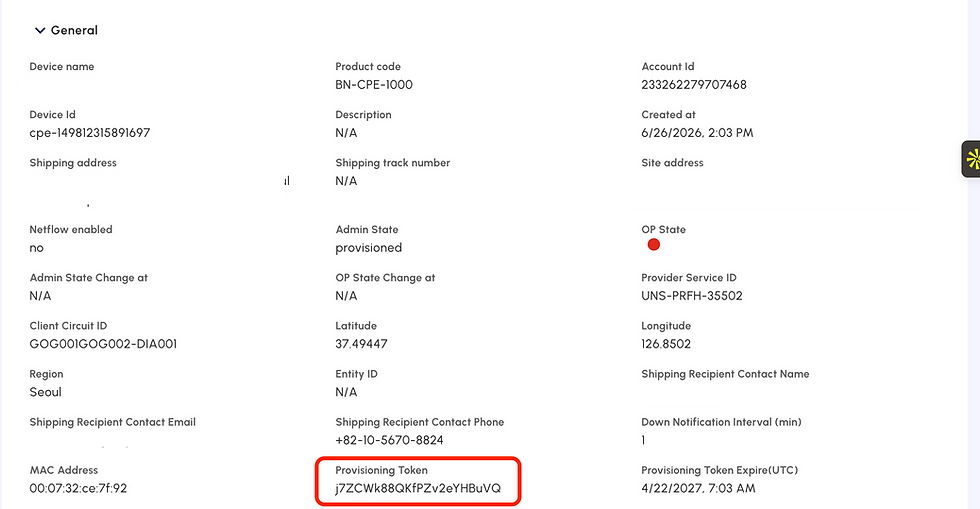
Step 2. Obtain provisioning token
Once the CPE is created, obtain the provisioning token by selecting the CPE and click Details -> General in the second half of the CPE list page, as shown in the following example.
Step 3. Prepare to install
Prepare the CPE to install by following these steps.
Power on the new Bumblebee CPE device
Connect the CPE's ETH0 port to a DHCP capable router that has the Internet access. (Connect ETH0 to a subnet that provides DHCP to clients and the subnet has Internet access.) Note at this point Eth0 relies on DHCP to obtain its IP address for the purpose of programming the image.
Connect CPE's ETH3 port (the diagnostics port) to your laptop, as shown in the diagram below.

From your laptop browser tab, type http://169.254.1.1 (You may need to disable Wi-Fi connection and enable DHCP client on your laptop)
You should see a pop up window on the browser page, as shown below. Enter the provisioning token you obtained in Step 2. Click Program CPE

The next page asks you to confirm the configuration of the CPE before programming, as shown below. Click Confirm if everything looks correct.

The programming starts after you enter Confirm. It takes two minutes for the programming to complete. When the programming completes, as shown below, click Shut Down to complete the process and power down the device.

At this point, the device is powered down and the installation is completed.
Re-installation
There are times one finds out that a CPE hardware need to be repurposed for a new CPE ID installation. In such situations, the CPE is no longer at the factory reset state. You can reinstall a CPE by following the steps below.
Generate a Registration Token. Select the new CPE, Actions ->Generate Registration Token. Copy the token
Input the Token. Connect ETH3 port of the old CPE to a laptop. Open a browser tab on the laptop and type http://169.254.1.1:8080 to access the CPE's diagnostics portal. Scroll down to the section Registration Token at the bottom of the page, paste the token obtained in step 1.
Click Save. Now the old CPE takes in the configuration of the new CPE ID.

Comments